Wednesday, January 30, 2013

Build-a-Tag with Sarah

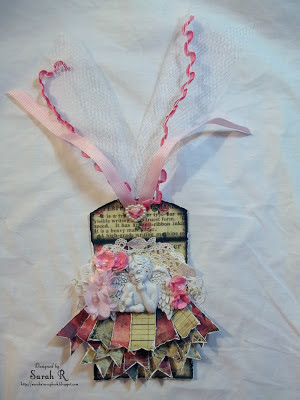
Hi There, Sarah here! Welcome to my February (yes, I know it is still January) tutorial for ScrapThat! This month, I thought I'd share with you how I made this Cherub Tag with the gorgeous ScrapThat! February Kit "With Love".
One of the things I loved about the Prima Romance Novel papers was that they were made for fussy-cutting and layering. There are so many  wonderful small elements on the papers - such as the section of an envelope that I used as the base for my tag. Here's the step-by-step of how I built the tag:

1. Gather all your papers/embellishments. For the tag, I used the envelope base cut from the Bookplate page and a strip of paper cut from the Dear John page. I used the paper and organza flowers, as well as the white tulle, two different types of May Arts Pink Ribbon and Heart Ribbon Buckle and Smooch from the Main Kit. I added in one of the Prima Resin Cherubs from the Embellishment Add-on and a small round doily from my stash.
2. Cut a two-inch strip of paper into 3/4-inch wide strips and cut a V in one end of each strip to create the banner pieces.
3. Distress the edges of all the banner pieces, the tag and the doily. I used a craft-knife and edge-distress for the tag/banner pieces and simply scrunched the doily.
4. Start assembling the tag. I started by placing the doily on the tag and then layered the banner pieces on top of each other, off-setting and raising each row above the previous one. 
5. Start embellishing! I rolled each of the banner elements upwards to add some more dimension to the tag.  I added the cherub as the focal point for the tag and the paper/organze flowers framing the cherub. I painted the inner petals of the paper flowers with the Smooch pearlized ink that was in the main kit (unfortunately this doesn't show up all that well in the photo - but looks really pretty in real life). I also added in a couple of small 'corkscrews' I made from the stems that I cut off the paper flowers.
6. Add the tulle and ribbon. I cut the tulle so that the ends each had a nice V shape to mirror the V of the banner elements. I punched a hole at the top of the tag and looped the tulle through it. I threaded the two different pink ribbons through the ribbon buckle and then glued that over the hole where the tulle was attached to the tag.
That's it - the completed tag! Here is a close-up of the finished tag taken from a slight angle so you can see the dimension and embellishments a bit better.
Thanks so much for stopping by the blog today. I hope you enjoyed my little Build-a-Tag tutorial. Be sure to post to our gallery if you decide to give this tag a try - we'd love to see what you do!

Tuesday, January 29, 2013

Sandi C's February Kit Creations!


Hello, Scrap That! friends! Today I am sharing my creations with the February kit "With Love" featuring Prima's Romance Novel collection. 

First up is a layout based on Amarylis' sketch. Be sure to check out her sketch challenge over in the Forum as well as the DT challenge on layering that I am hosting. We'd love to have you play along! 


"Unforgettable Sopapilla" 
Main kit, Flower Add-on, stash

This was such a fun page to do! As part of a dgd's graduation luncheon, we went to a great restaurant on the Riverwalk at the Gaylord Texan. A couple of the gals shared this gorgeously presented, as well as yummy, flute of sopapillas with honey! I've done lots of layering, some deep distressing and even got out the Circut to create my title. The Pima flowers were so perfect for this color scheme that I just had to use them here.  I loved using the square doily included in the Main kit as an extra layer.  All the sheets with cut-outs were resources for subtitles, quotes or simply as tags. The black Prima swirl is from my stash as is the curled jute. 

Just a close-up of the tabs. 

Another close-up of the floral cluster and netting. The leaf is from last month's kit. 

_________

Next, a more romantic page with plenty of feminine touches.

"A Perfect Day"
Main kit only plus some personal stash

This photo was taken the same day as the one used about. A big shout out to Kristen Alexander for being our photographer that day and for sharing her photos! This one is really special to me because it shows my sweet dd, dgds and their friends taking things a bit slower that day to accommodate a couple of grandmothers who were not able to keep the pace as easily that day. I've written a note about how much that meant to me and placed it on the little floral pint envelope I created with the kit and placed above the photo.

As you can see I also use a Donna Downey (Prima) stencil and some molding paste to use on my bacakground.  Although a bit of it is covered, I just had to use it! The punch work around the edges is a Martha Stewart Swirling Lace punch and on the pink panel is it her Scroll Heart punch. Behind the peek-a-boo is a piece using the Floral Vine punch. 


The floral cluster including a blue Manor House bloom from my stash as well as a Prima Romance Novel trinket. But don't you love that soft pink bloom? I've chalked the edges of it a bit for definition. 

Close-up of the peek-a-boo where I've added the pink and white twine and a small pink bloom both from the main kit. 

Close-up of the tags and my (floral) secret journaling envelope! 

________

And last but not least:

"Ride On"
Main kit, Flower Add-on, Embellishment Add-on, stash

I always enjoy doing a round layout now and then! Helena Johansson is my inspiration for doing them!  I will be doing a Build a Page tutorial on this layout on February 8th, so I won't go into a lot of detail here. Be sure to come back and hear all about how I created this one. 

The photo is of my dgd Marianne riding her tricycle and grinning all the way! You can see that I've added lots of flowers, trims, and other embellies from the main kit and from the EAO as well as the FAO.  I did tuck in a couple of bright blue flowers to bring out the blues a bit more both from the photo as well as the patterned paper. Butterfly courtesy of Lisa Gregory. 

Just a close-up of the doily edge I'll be talking about during my BAP tutorial. 

Thanks for coming by! I love reading all your sweet comments! 


Monday, January 28, 2013

Blog Hop Winner, LOTW Winner and Announcements

Thanks to everyone who took part in our blog hop this weekend. There were so many delightful participants and your comments are so appreciated!! 

Blog Hop Winner

Our blog hop winner of our April Main Kit selected by Random.org is:

Cathy Caines!!

Congratuations, Cathy!

Please contact me at traceysabella@scrapthat.ca to send your shipping information. Thanks!! 

LOTW Winner

Sarah had quite a challenge this week selecting a Layout of the Week with all the gorgeous projects in the gallery. Her pick is this gorgeous LO by Tina Suitella:

"Family"

Congratulations, Tina!!
Please contact Sarah for your LOTW Badge. 

Announcement:
Please note that shipping costs for U.S. customers have increased and will be reflected in future invoices.

Friday, January 25, 2013

February Kit Reveal and Blog Hop !!

Welcome to the ScrapThat! February Kit Reveal and Blog Hop!! 

If you want to start at the beginning, here is the order:

We are so thrilled to welcome back the incredible
Lisa Blastick
as our February Guest Designer!


Lisa is a passionate paper crafter who became "addicted" to scrapbooking in 2006 and added card making in 2011. Lisa is a former ScrapThat! designer. She currently designs for Heartfelt Creations and Donna Salazar Designs, and her gorgeous work has been published in Scrapbooks Etc. and Creating Keepsakes Magazines. 

Be sure to drop by Lisa's Blog, Beyond Beauty, to see some of her amazing pages and cards!  

SO WITHOUT FURTHER ADO-Introducing our gorgeous February Kit reveal -
"With Love"

This romantic kit features the incredible rich colors of Prima's Romance Novel combined with neutrals and pinks to enhance the beauty of these papers. This is one of those kits where you, "Ooh" and "Ah" as you take out each treasure. Don't just think girly, because there are many directions you can take this kit, as our DT will show you.

Main Kit


Embellishment Add-On


Flower Add-On


Paper Add-On

More details on this romantic Collection can be seen here: ScrapThat! Store 

We are currently accepting new
Kit Club Members.
For more information,
complete the form on the link below:
New Subscriber 

Look at the beautiful sketch Amarilys has created for February:


See details about the challenge here: Sketch Challenges
Be sure to also check out the details of our monthly DT challenge hosted by Sandi here: DT Challenge
Everyone is welcome to participate, all entries for both challenges due by February 20th.

Our Blog Hop features 9 fantastic blogs including our Design Team.
We have been scrapping away and are so excited to show you our  creations!

Our SPECTACULAR February Blog Hop Prize 
Is a ScrapThat! April Main Kit, Serendipity
This kit is chock FULL of fabulous scrapbooking products including the amazing Sweet Nothings Collection from Kaiser Craft. With rich warm colors and rustic embellishments like wooden gates and bronze cord, this kit lends itself beautifully to heritage layouts. We have included a white pen for you to use when creating a faux stitching effect.
 

To qualify for this month's FABULOUS Prize you must complete the following:

* Visit each blog listed on the hop to see what each designer has created using this month's kit and sketch (comments are very much appreciated).
* Each designer's blog hop post will feature a word to make up a secret sentence, 
collect these words along the way.
* You must become a FOLLOWER of each blog along the way
 and LIKE us on our Facebook Page!
* Post the ScrapThat! Blinkie on your blog.
* For your last stop on our Blog Hop return here to the ScrapThat! Chat Blog.
Leave a comment letting us know you have
completed the hop.
(Please do NOT include the secret sentence in your comments.)

*Email the secret sentence to Tracey Sabella: tracey@scrapthat.ca
The Blog Hop ends Sunday, January 27th at Midnight EST


The prize MUST be claimed within 3 days of the forum announcement which will also be made on the ScrapThat! Blog.
~ If left unclaimed a NEW winner will be chosen ~

**Winner will pay actual shipping costs for sending the kit from Canada.**
Shipping costs will be invoiced via PayPal unless you are a kit member, then your prize will be shipped with your monthly kit.
Prizes won during the month will be mailed out the first week of the following month.
Due to Customs clearance, International mailings sometimes take 30-75 days to receive.

The First secret word is: You


Next hop over to


For your final stop, return to the ScrapThat! Blog to let us know you have completed the hop.
Remember ~ only send the secret sentence to tracey@scrapthat.ca
Happy Hopping!

Wednesday, January 23, 2013

Challenge winners!


Hi everyone, Amarilys here, announcing the winners for both the January Sketch Challenge and the January DT Challenge-The Soundtrack of Our Lives. Between both challenges we had AMAZING entries and because no one likes the task of choosing a winner, we leave it to random.org! :)

So, according to random.org the winner for the Sketch Challenge is.......

Jackie Edwards

and here's you RAK! Please PM me on the NING site your e-mail address,  full name and mailing address to get these awesome RAK out to you ASAP!


and the winner for the DT Challenge is:


Rene' Bailey

 and here's you RAK! Please PM me on the NING site your e-mail address,  full name and mailing address to get these awesome RAK out to you ASAP!


Congrats ladies! I want to take this time to encourage you to play along the monthly challenges. The February Challenges will open during the Blog Hop and Kit Reveal this Friday, 1/25. Hope to see you there!

February Kit Sneak Peeks ~ "With Love"

Our designers have been so busy creating with our awesome February "With Love" Scrap That! Kit.
 We are super excited to share a few sneak peeks of their gorgeous work:


Stay tuned for our Blog Hop and February Kit reveal on Friday, Jan 25th, 6:30 AM EST. 
 You will want to visit all the designer's blogs to see their amazing work with this month's kit ...
 and for a chance to win our grand prize this month, the April Serendipity Kit. 

~So .....  See you Friday! ~ 

Tuesday, January 22, 2013

Introducing our February Guest Designer ~ Lisa Blastick

ScrapThat! is delighted to introduce our
January Featured Guest Designer
The Extraordinarily Talented 

Lisa is a former Design Team Member of ScrapThat! and we are so excited to have her return for a visit to share her beautiful work with our February Kit.


Hello, My name is Lisa Blastick (aka) kaye222. I'm hugely addicted to scrapbooking. I started my first page in the beginning of May 2006. Since then, I have finished many albums. Of course, I soon found out there is no finishing.... I have been very fortunate to be published in Scrapbooks Etc. and Creating Keepsakes issues, as well as online scrapbooking websites. I currently design for Heartfelt Creations and Donna Salazar Designs and love every minute of it! 

I'm also addicted to making cards now, too. I started creating them in May 2011, must be my month for starting new creations? I LOVE making them but always seem to forget to send them out??? lol.. I am a married mother of four young adult children!!! I have two girls (23,20), twin sons (22), and two spoiled rotten Italian Greyhounds. I have been an operating room RN for the past 16 years. I really like my job but I much rather be creating....all the time! Hugs...Lisa

Be sure to drop by Lisa's Blog, Beyond Beauty, to see some of her amazing pages and cards!

Monday, January 21, 2013

Snowflake Rosettes - Sarah's "Pinspiration"

Sarah here - I thought I would share my "Pinspiration" for the snowflake rosettes I created with the January ScrapThat! Kit. 
I absolutely love Pinterest - such a great source for inspiration for anything and everything you're looking for and I find a lot of great crafty ideas on the site.
 Click Here for the Pin that led me to the tutorial on how to make these lovely rosettes. 
And while you're on Pinterest, be sure to check out the ScrapThat! boards!

Sunday, January 20, 2013

LOTW- Jan 20th

Hi everyone, Amarilys here today to share with you our LOTW! Now, the gallery has been beaming with amazing layouts, cards and projects but one of them stood out.

Help me congratulate Cathy Caines, since her layout "Home" was chosen as LOTW this week!

Home

Her sweet title, mixed media and beautiful pictures come together perfectly! Please stop by her layout and leave her some love! Congratulations Cathy!! Please send an email to amadrian8@yahoo.com for your LOTW badge code.

Saturday, January 19, 2013

January Kit Creations by Tracey S.

It's Tracey S. here to share my January Kit Creations with you. What an amazing kit this was to work with, so packed with fabulous embellishments so perfectly paired with the BoBunny Powder Mountain collection!!

We moved back to Ohio to be closer to family in 2000 and are now used to snowy winters, but when we lived in North Carolina a snowfall covering the ground was a rare event. This is our Carolina home during one of those snows.

"Carolina Snow"
Main Kit

Here are some close-ups of my handcrafted flowers and pinecones clustered with vintage buttons from my stash and the lovely kit pearl strand.


My first attempt at quilling for this snowflake. The pattern can be found here: Resse Dixon Quilled Snowflake

For this snowflake I used Martha Stewart White Texture Effect:

My next layout is of a shot taken at my parent's home on Westville Lake in Ohio. As soon as I saw this paper, I had a vision of creating a window in the lodge wall.

"Westville Lake"
Main Kit, EAO, FAO

To make this window frame, I created a cut file on my Gazelle to fit my photo. You could also cut the chipboard with a craft knife. I painted the chipboard brown then covered in crackle accents. When Dry I took the white Prima chalk ink and brushed across the frame gently to highlight the cracks. 

A close-up of the vocal flower and vine. 

One of my layered Snowflakes. I cut the corrugated board with my Sizzix Snowflake die, and a smaller flake in kraft, then topped with one of my hand crocheted snowflakes, Bitty Blossoms Rose and pearls from the EAO kit.

And a side view to see the dimension:

My final kit creation is another Carolina snow. The children and I built this snowman in our front yard to the delight of the passersby! 

"Frosty"
Main Kit, EAO, FAO Kits

I created these sweet white fabric flowers using the main kit stamens to complement to focal kit flower.  The corner flourish was created with modeling paste and microbeads for some wintry shimmer. The white sparkly snow is a mix of Fran-tage embossing powders and flakes sprinkled on my page and heat set from below. 

 I altered the Prima flowers by opening them up and spritzing with Sapphire Glimmer Mist. The white leaves were cut with Spellbinder's Folaige dies, pinched to create the leaf veins and then covered in crackle.

Another of my handcrafted crocheted Snowflakes topped with a Powder Mountain button.

A cluster of BoBunny snowflake buttons, crocheted snowflake, Bitty Blossoms rose and paper punched snowflake heat embossed with holographic embossing powder to add sparkle. 

Thanks for stopping by. I hope you found something new to try out on one of your own projects.