Tuesday, June 22, 2010

DARIEN's LOVE LAYOUT

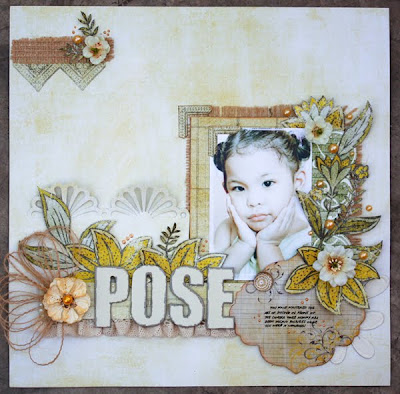
Hi! This is Darien and today, I want to share some tips about how a made this layout of my stepson and my daughter. Fist, I really enjoyed working with the "Queen Bee" Kit. I love the yellows and black, so sophisticated!

I wanted the focus to be on the picture so I did a lot of inking so I could frame the picture. I cut the Creative Imaginations Transparency and use it to frame the picture for a dramatic look. Then, I misted the Prima flowers that came in the kit and removed the centers of the original flowers and used the beautiful Bella Brads instead and the look is amazing!!! I love the Bella Brads - - they are really elegant and fun to work with!!!  I cut some leaves of one of the patterned papers for the perfect touch! For the big title,  I used the chipboard letters and just painted them using black crackle paint.

I really hope you are all having a great summer!!!! And lots of scrapping time!

Darien

Monday, June 21, 2010

SNEAK PEEK FOR SCRAP THAT!'s JULY KIT


One word to describe the July Kit:  Heavenly!!!  Watch out for the full reveal on the 26th!!!

Sunday, June 20, 2010

BURLAP LOVE

Hello.This is Karen blogging today for Scrap That!.Here's a layout of my son, I created with the wonderful papers in the June "Queen Bee" Kit. I tried to keep this one 'boyish' and free of flowers. :p


We were given a 12x12 sheet of burlap, which is the latest trend in the scrapbooking world. It is sooo much fun to work with! I used it as part of my background paper, having only snipped it down a bit, to make it the right size. You can leave it as is, or do as I did and pull out a few strings horizontally and vertically, to offset the corners. You could even pull out every other string leaving gaps between them, giving the burlap a slightly different look. (NOTE: I used my left over burlap strings to thread thru my buttons) Whatever method you choose to use on your burlap, it is sure to add such great effortless texture to your project.


To finish this layout, I inked the bingo cards so there could be more contrast and tucked them behind the corners of my photo. I cut out a few circles from the Queen Bee papers and embellished them with buttons. Lastly scattered some pearls (which is better than flowers!) ...and I was done!


Hope you all enjoy this layout.  =)

((HUGS))
Karen

Saturday, June 19, 2010

TIPS ON PHOTOGRAPHING YOUR LAYOUTS

Hello!  This is LG blogging today here at Scrap That!.  When I just started scrapbooking I thought that the process of creating a page was the hardest part, but I found photographing my finished layout more difficult because I was having a hard time capturing the real look of my page. The color was off, the alignment was slanted, and the photograph looks so different from the actual layout.

As I have tried several cameras I found out that the main key to get a good photograph of your layout is LIGHTING. Here are some tips that i have read and discovered:
  • the best time to photograph your layout outdoors is 1hr after sunrise and 1hr before sunset. This is the ideal time of the day because the sunlight is not that strong and the brightness is just right.
  • when taking photos indoors, take a photo in the afternoon when the sun is so bright. Find a room that has enough light. Make sure that the wall painting is white because colored rooms bounce back the colors to the layout.
  • you can also use a white cardboard to bounce the sunlight.Simply locate the sunlight in your room. Position the cardboard directly to the sunlight to bounce the light towards your layout.
  • if you want to use an artificial layout, create your own mini lightbox. You can find the intructions here: HOMEMADE LIGHT BOX. If I have time I definitely will make me one of those.
  • never photograph your layout using your flash or putting your layout directly to the sunlight! This will create strong shadows or the light might bounce back on the photo of your layout if you have used a glossy photo paper.
POSITIONING of your layout is very essential too. This will make it easier for you to crop your image later on using a photo editor software. Here are some tips on positioning your layouts
  • you can adhere your layout on a wall at eye-level
  • you can also use a photo stand
  • or simply place your photo on the floor (this is mostly what I do)
  • before taking a photograph of your layout, imagine a grid on the view box of your camera. Make sure that the spaces on all sides is parallel to the layout.

CAMERA. I think the best results is with a digital camera, preferably an DSLR camera like the Canon Digital Rebel. But if you don't have one it is okay to use a regular digital camera keeping in mind that the quality is different when using a DSLR. With good lighting you can still get a very decent photo of your layout.
  • Set your camera to Auto Depth of Field setting and shoot. The auto depth of field keeps all elements equally important visually, which makes the text and photographs all stay focused.
  • Use a tripod if your speed is below 100 to make your photo sharp.
  • ISO must be set not higher than 400. The higher the ISO the greater chance of getting grains-look on your photograph
  • Instead of just taking one photo of your layout, take several. It's easy to delete anyway. This will allow you to capture the perfect photo.
PHOTO EDITING SOFTWARE. After photographing your layout, it is still important to add some minor adjustment to your photograph by using some photo editing software. I actually use 2 software, Adobe Photoshop Lightroom and Adobe Photoshop CS4.

Usually I use Lightroom to edit the colors because it has the capability to adjust the colors individually unlike Photoshop. If you edit a color on Photoshop it will adjust the entire photo and make it all green for example. In Lightroom it only adjust the green colors thus you can make it more vibrant or pale. I do them first on Lightroom then I just do the cropping or cleaning(removing spots) on Photoshop.

Whatever photo editor software you use, just adjust the levels, brightness, contrast or color balance to get your desired outcome. Crop it! I suggest you place your layout near you so that you can use it as guide as you do some adjustment. Make it look like as close to the actual layout.

You're done! You can now upload your layout online!

Hope I was able to help you get an idea on how I photograph my layouts.  Until next time!

LG

Thursday, June 17, 2010

ALTER YOUR FLOWERS MINI-TUTORIAL

Hello!!!  This is Janis blogging for Scrap That! today!!!  I put up a mini-tutorial on how to alter the Prima Innocence Crinkle flowers that are included in the June Add-on Embellishment Kit.  You can also use the steps here to alter any flower you want.  Enjoy!

Supplies:
Prima Innocence Crinkle Flowers 
Ranger Distress Ink (I used Shabby Shutters)
Glimmer Mist (I used Pearl Shade)
Distress Stickles (I used Vintage Photo but you can use the ordinary Stickles)
Pearl/Bling as flower center
Adhesives/Tacky Glue

Step 1:  Take apart your flower layers very carefully.  Cut the two big layers as shown.


Step 2:  Glue one petal on top of the other so that the end flower will have one petal less.


Step 3:  Using tacky glue, glue all the layers on top of each other.  My flowers have 3 layers:  4 petaled, 5 petaled, and the original 6 petaled flowers.


Step 4:  With a dry brush, apply distress ink on your flower center.


Step 5:  To add a bit of sheen plus to activate the pigment of your distress ink, mist directly on your flower center.


Step 6:  Apply Distress Stickles (or Regular Stickles) on your flower center.  Add pearl or bling as flower center.


Here's my final altered flower:


And here's the layout where I used the flowers I have altered in this way:


Fast and easy way to make your already beautiful flowers much more beautiful!  ;o)  You can also use this tutorial in doing the fun challenge I have in this THREAD.

Have fun creating!!!

Tuesday, June 15, 2010

GRAND PRIZE WINNER!

The moment all of our hoppers have been waiting for!  

We sincerely hope that this past weekend's Blog Hop was fun and enjoyable for everyone.  We are so glad you joined us, and hope you will continue to be a part of our community.

At Scrap That! our goal is to inspire you and  nurture your creativity, and we hope you found that on the many wonderful Design Team Blogs you visited.

I won't keep you in suspense any longer.............

Without further ado.............

The winner of the GRAND PRIZE, a Cricut Personal Electronic Cutter............


Is...................Yara Freytes!!!!  Congratulations Yara!!  Please email friends@scrapthat.ca with your shipping address so we can get this bad boy in the mail to you :)


SOLD!! To the Lady in the Pink Pajamas!

Scrap That! is moving, and everything in the store has been reduced 40-70%!

We’d rather pack it and ship it, than pack it and move it!

Sooooo we'd like to give a great big THANK YOU to everyone who helped to "lighten the load!"

All orders received before midnight on July 12th were entered into a draw to win this handy “To Go Bag” tote with removable pouch.

 And the winner is..................
Pam Campbell!! Congratulations Pam! Your tote is in the mail!

Monday, June 14, 2010

Blog Hop Winners!

Hello Everyone!  Thanks to all who participated in our blog hop this past weekend.  I hope you all had fun and enjoyed the beautiful eye candy and tutorials provided by our team of very talented designers.

Watch here and on our blog for the Grand Prize Winner to be announced tomorrow!

First: we have 8 winners - the Design Team each picked one comment from each of their blogs to win a 116 piece paper crafting kit from Sassafras Lass!  And the winners are:

Vicky   http://simplypaperandcreativity.blogspot.com/  Janelle Bennett
Janis http://thereluctantscrapper.blogspot.com/  Sandy Calder
LG http://scrappinworld.blogspot.com/  Molly
Karen  http://agirlsscrapobsession.blogspot.com/  Rennee Clapson
Darien  http://darien-lovingmylife.blogspot.com/  Natalie Elphinstone
Tara http://eachmoment-onlyonce.blogspot.com Eryn Ancelet
Melissa http://8ers.blogspot.com Jocelyne Chartrand
Scrap That! http://scrapthatchat.blogspot.com  Vicki Wilson

Please email friends@scrapthat.ca with your full name and address so we can mail your prize to you!!

The winner of the June "Scrap That! Spot This!" Contest is Penny Brellenthin.  Penny correctly spotted the Kaiser Craft Black Pearl Strips in Vicky Alberto's "Savor the Journey" layout.  Please email friends@scrapthat.ca with your address penny so we can send you the June "Queen Bee" sampler kit!

Next on our list of winners is Helga Vergara who played the "Scrap That! Hound Hunt" and successfully located the Scrap That! Mascot Gucci - the adorable Yorkie! 
https://www.scrapthat.ca/ScrapAdmin.php?target=products&mode=update&product_id=31810#detailed
Send us your address Helga and we will mail you a 3 Bugs in a Rug Caboodle kit!! Email it to: friends@scrapthat.ca

Stay Tuned for the Grand Prize Winner of the Cricut Personal Electronic Cutter,  who will be announced tomorrow!!

Congratulations everyone and thanks for hopping with us!!

Thursday, June 10, 2010

“WELCOME SUMMER” Blog Hop!

 If you are looking for the Scrap That! "WELCOME SUMMER" Blog Hop you are in the right place!  We are so happy you could join us :) We have 8 AMAZING blogs for you to visit. Each blog will have
some beautiful eye candy and/or a wonderful little tutorial to share with you.

We also have a BUNCH of fabulous prizes to give away. Keep reading and you will find out some of the ways you can become eligible to win!

First of all, you will need to visit all the blogs :) There will be a randomly drawn comment winner from each blog! These 8 winners will receive a paper crafting kit from Sassafras Lass.

Next, while you are hopping, you will want to be looking for the “special” word on each blog. Once you have visited all the blogs and collected all the special words, they will create a sentence.

Once you’ve done that you’ll need to swing by our facebook page, and become a friend, and then head over to our social community and become a member. Once you’ve completed these tasks, email the sentence to friends@scrapthat.ca

All correct entries received will be entered into a draw for the GRAND PRIZE, a CRICUT Personal Electronic Cutter!

During the hop you will want to watch for details on one of the blogs about playing "Scrap That! Spot This!" for a chance to win one of the June “Queen Bee” sampler kits which contains well over $33 in product.

If you are still looking for another opportunity to win a fabulous prize then be on the lookout for information on the Scrap That! “Hound Hunt”!

Is your head swimming yet with the mention of all these prizes??

Well let's get started!! This is going to be a fantastic hop and we hope you will have as much fun hopping as we had organizing!!

The blog hop order is:

Vicky   http://simplypaperandcreativity.blogspot.com/
Janis http://thereluctantscrapper.blogspot.com/
LG http://scrappinworld.blogspot.com/
Karen  http://agirlsscrapobsession.blogspot.com/
Darien  http://darien-lovingmylife.blogspot.com/
Tara  http://eachmoment-onlyonce.blogspot.com
Melissa http://8ers.blogspot.com

So get your hop on and get over to the first blog on our list!

Wednesday, June 2, 2010

Are You Ready To Get Your Hop On?

Join us for the Scrap That! “Welcome Summer” Blog Hop.

We will have 8 AMAZING blogs for you to visit.  Each blog will have
some beautiful eye candy and/or a wonderful little tutorial to share with you.

We also have a BUNCH of fabulous prizes to give away.  Keep reading and you will find out some of the ways you can become eligible to win!

First of all, you will need to visit all the blogs :) There will be a randomly drawn comment winner from each blog! These 8 winners will receive a paper crafting kit from Sassafras Lass.

Next, while you are hopping,  you will want to be looking for the “special” word on each blog.  Once you have visited all the blogs and collected all the special words, they will create a sentence.

Once you’ve done that you’ll need to swing by our facebook page, and become a friend, and then head over to our social community and become a member.  Once you’ve completed these tasks, email the sentence to friends@scrapthat.ca

All correct entries received will be entered into a draw for the GRAND PRIZE, a Cricut Personal Electronic Cutter!

During the hop you will want to watch for details on one of the blogs about playing "Scrap That! Spot This!"  for a chance to win one of the June “Queen Bee” sampler kits which contains well over $33 in product.

If you are still looking for another opportunity to win a fabulous prize then be on the lookout for information on the Scrap That! “Hound Hunt”!

Is your head swimming yet with the mention of all these prizes??

The hop will take place June 11th and 12th, so get your hop on, and get over to www.scrapthatchat.blogspot.com!

(International hoppers outside of Canada and USA must pay shipping on any prizes won)

Tuesday, June 1, 2010

June Scrap That! Spot This! Contest

During the last week of each month our design team reveals their projects using the Scrap That! monthly kit.

One of our designers is given a product to incorporate into one of their projects that none of the other designers get.

All you have to do is look through all the design team projects, spot the item pictured below, and submit the name of the designer, the name of the Scrap That! kit, and the name of the layout.  (HINT - you will need to look carefully - we've made it a bit tricky this month!)

Each correct entry will be entered into a draw to win the monthly sampler kit! Each of our kits contains well over $33 in product!!

Each month we create a unique and innovative kit FULL of carefully selected high-end double sided papers, specialty papers, premium embellishments and often include one-of-a-kind specialty and handmade items you won’t find anywhere else. We include a signature product every month to collect, a scrapbook layout sketch, and one technique type product including instructions and tips on how to use it.

Our mission is to nurture your creativity by providing the best products available, at a reasonable price to get the most out of your scrapbooking budget.
You can view the Design Team projects below under the Design Team Reveals Post.
or in our community gallery www.scrapthat.ning.com

Submit your entry to friends@scrapthat.ca by June 12th. (only one entry per person please)  The draw will take place June 14th. Good luck!