


If you are here for the Scrap That 2nd Anniversary Blog Hop, CLICK HERE!!
Hi everyone...Sandi posting today and sharing a flower I made with the Scrap That! 2nd Anniversary Kit. I have seen so many lovely flower tutorials using Sizzix
dies but I do not own a die cutting machine...just a few punches. So I
want to share how I improvised and came up with this flower :

This is what you will need:

1. Any 5 petal flower punch. Mine are the extra large and medium
2. Decorative scissors
3.Ink
3. Skewer or paint brush(I used a quill from an older Scrap That!Kit)
4. Stylus or Sharpie marker to round your flowers
5. Glue(not shown). I used a glue gun cause I hate waiting for glue to dry.

These items are optional but can be used to add a little sparkle to your flower.

Step1: Punch out 3 large and 5 medium flowers. You can use the same paper for all or mix it up for a bit of contrast like I did.

Step 2: Using your decorative scissors, cut along the edges of the larger flower so you end up with three different sizes,each one
just a little smaller than the previous.You can also trim the edges of the smaller flowers. Then ink along the edges.
Step 3:

 Pinch
one of the smaller flowers together until it looks like the first
picture. Then take the remaining 4 flowers and roll around the edge of a
stylus or marker. When done,it should look similar to this:
Pinch
one of the smaller flowers together until it looks like the first
picture. Then take the remaining 4 flowers and roll around the edge of a
stylus or marker. When done,it should look similar to this:
Step 4: Glue
the flowers together starting with the tightest rolled flower and don't
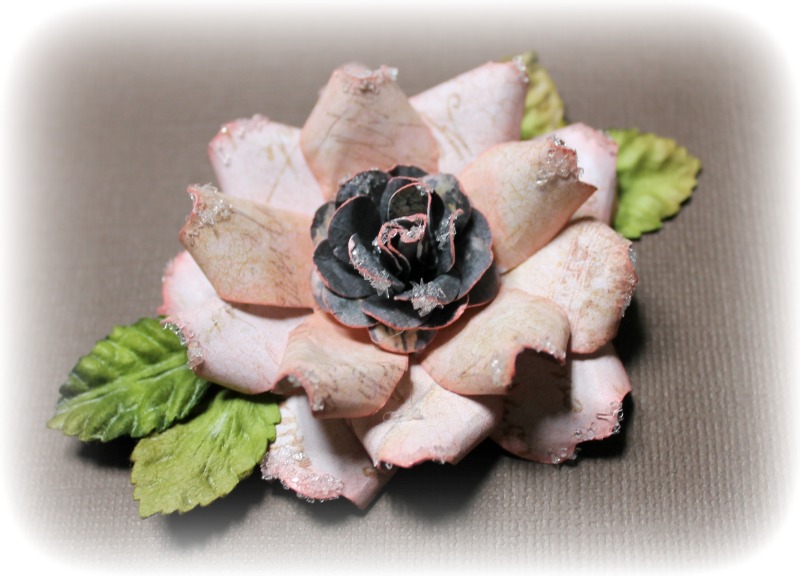
forget to stagger your petals with each layer. The end result should be
like this:

Step 5: Using your skewer/paint brush,roll the edges of the three larger flowers towards the middle so that the three flowers look similar to this:

Step 6:
Now stagger the three flowers starting with the smallest on top and
then glue the smaller flower on top of the larger petals and add leaves.
You can always add Stickles, Glitter or Diamond dust for some extra
sparkle.
Here
are a few more I have made. You can change the look by folding the
petals differently, using different decorative scissors or even adding a
bit of cheese cloth between layers...lots of possibilities!

If you have any questions, feel free to ask! I look forward to seeing your flowers!


I absolutely love this!!
ReplyDeleteBeautiful flowers :) Tfs !
ReplyDeleteSo Beautiful flowers, Sandi! TFS! :)
ReplyDeleteSandi, thanks for the detailed steps on creating the flowers. Beauties of course!
ReplyDeleteava
Sandi these are gorgeous... I just have to give this a try! TFS!
ReplyDeleteSweet flowers Sandi! Thanks for the tutorial - I don't have a die cut machine either so I love that these don't use one :)
ReplyDeleteWonderful flowers and clear instructions - I'll be making these soon!
ReplyDeleteWow-- beautiful flowers!
ReplyDeleteThat is really impressive....
ReplyDelete