Monday, April 8, 2013

Round Robin Contest at ScrapThat! to Celebrate National Scrapbooking Day


May is an exciting month for ScrapThat! Not only does it start off with National Scrapbooking Day, but it is our Anniversary month! Wait till you see who our guest designer is!!!

For some extra fun we want to do a Round Robin. For those who have never played, a Round Robin is usually 3-4 groups of 4 people each. Each person is assigned week 1-4. The Week one person posts a layout that the week 2 person scraplifts. The week 3 person then scraplifts the week 2 . . . you get the picture. At the end of the month we pick a random winner from all the entries.

We have a great prize too ~ our January Main Kit featuring BoBunny:
January-2012-MK.jpg
(The winner will be invoiced for shipping costs.)

Be sure to sign up in our forum and join the fun!! 

Sunday, April 7, 2013

LOTW- April 7th *Leila Cassimira Cardoso*

Hi everyone, Amarilys here today to share with you our LOTW! Now, the gallery has been beaming with amazing layouts, cards and projects but one of them stood out.

Help me congratulate Leila Cassimira Cardoso, since her layout "Beloved" was chosen as LOTW this week!

Be loved

Her sweet title, mixed media, vibrant colors and beautiful picture come together perfectly! Please stop by her layout and leave her some love! Congratulations Leila! Please PM me for your LOTW badge code.
You are also eligible for 10% off any of our 2012 kits left in stock-including add-ons!

Remember to upload your projects to our Gallery for a chance to be chosen as LOTW! Not only do you get a gorgeous LOTW badge, you also receive 10% off any of our 2012 kits left in stock-including add-ons!

Friday, April 5, 2013

Mixed Media Video Tutorial by Lynn Shokoples, Featured April Guest Designer

Morning Everyone! It's Lynn today and I'm sharing a tutorial with you on how I did the background on my layout using some Crafters Workshop Stencils, Modeling Paste, Tattered Angels Glimmer Mist and some Lindy's Stamp Gang Mists. Now this is the first ever photo/video tutorial I have done so I hope you like it! 

This layout was done using the April Main Kit and the Embellishment Add-On Kit. Once I was done spraying the background, I just had to add a little to the flowers!
Now here's the video!!


Thanks everyone for letting me share my tutorial and hope your all having a wonderful day!

To see more of Lynn's amazing work be sure to stop by her blog!

Thursday, April 4, 2013

Curly flower tut

Hi everyone! I love making flowers and the one I make a lot is a curly flower...I am not the original designer of this flower, I saw it by CraftBrulee on YouTube and changed it just a little bit to suit what I needed.

To make this flower you will need
2 - 6 or 5 petal die cut flowers (you can use the tattered flowers die by Tim Holtz but I used my cricut Flower Shoppe cart)
2 - 9 or 10 petal flower

1 skewer or small paint brush
1 foam piece like from your brads come in
ink
hot glue
pencil with an eraser on the end
scissors

1 - taking your scissors cut each petal on your 6 petal flowers so its a little bit longer like this, being careful not to cut too deep


2 - ink the edges of each petal


3 - fold each petal in half


4 - fold the petal back like you do a paper airplane


5 - when you are done your flowers will look like this


6 - using your paintbrush or skewer roll each petal one forward and one back


7 - when you are done it will look like this


8 - using the foam place you first 6 petal flower on it....press down using the eraser end of your pencil so it forms a bit,


9 - add some hot glue, and add your second 6 petal flower so the petals are alternating and push down with your eraser end of your pencil


10 - add your first 9 petal flower leaving the center a little open and glue down


11 - add your second flower to the center of the first curly flower and add a little ink to the top if you would like

your flower is done!


here is a layout I created using these flowers and this months wonderful ScrapThat! kit!


 Thanks for stopping by and I hope to see some curly flowers on your project!

Wednesday, April 3, 2013

Sarah's April Kit Creations


Sarah here to share with you the details and close-ups of my layouts created with the ScrapThat! April Kit - "Within Nature".
~~~~~~~~~~~~~~~
Shattered
(Main Kit plus Mixed Media Supplies from Personal Stash)
First up is my Shattered layout. This layout is based on the March 15 Sketch at Another Freaking Scrappy Challenge and is sort of a companion piece to a layout entitled Through the Looking Glass that I created in January.

This is a pretty personal, revealing layout for me. I'm a very private person and don't often share my 'troubles' with others - but I've been dealing with some personal issues lately and sometimes it is cathartic to release some emotion through artwork. So this layout describes how I have been feeling - shattered - but I'm picking up the pieces and putting things back together - re-evaluating my priorities and what is important to me.
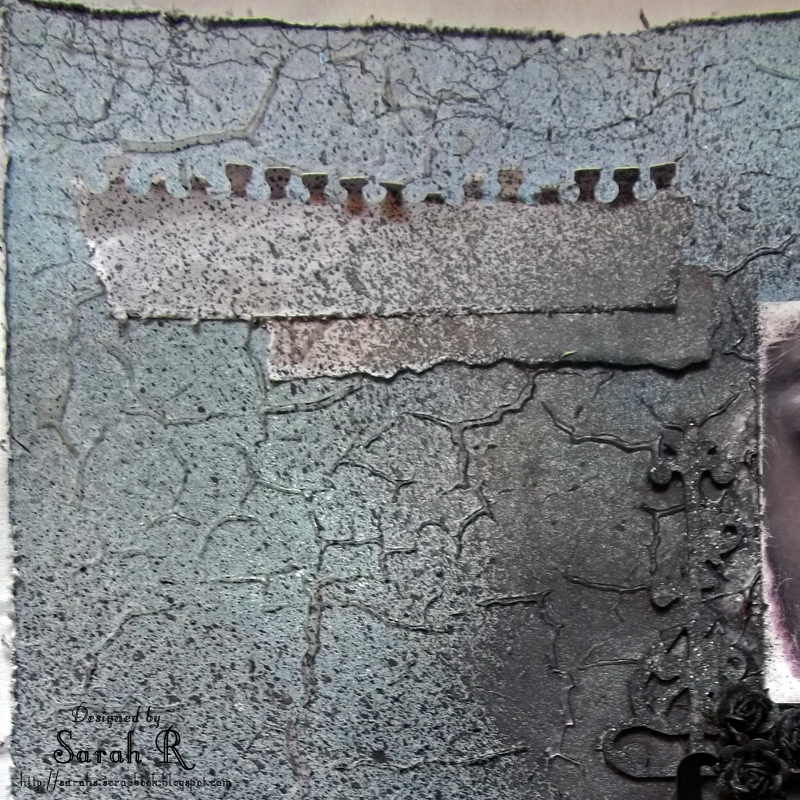
Enough about me - let's get down to the nitty gritty of the layout. I started out with one of the sheets of patterned paper in the Main Kit - the 'Soaring' page and used the lighter coloured side as the base page for the layout. I used the Prima 12 x12 Crackle stencil with some Heavy Gel Medium to get the crackled effect on the base page and then misted it with two shades of smooch spritz (Splash and River Mossy).  Here is an angled shot of a section of the layout that better shows the crackle effect.
I did some stamping around the edge of the layout and where I was placing the title with a Kaisercraft Texture Stamp (Crackle) and black ink. I cut the torn 'notebook' paper edge using my Silhouette Cameo and tore the other paper strip for the paper embellishing in the top left of the layout.
I added a white smudged circle under the photo with gesso (you can just see the edges of the circle) and did some simple embellishing using the chipboard sign and roses that were included in the Main kit. I separated the chipboard sign and used the two elements to frame the photo. Once I had the chipboard and flowers in place, I did some more misting with Smooch Spritz in Black Velvet. I also added some Distress stickles in Clear Rock Candy to the chipboard elements after the misting had dried. Finally, I added some vinyl letter stickers from my stash for the title.

~~~~~~~~~~~~~~~
Sweet Puppy
(MK, FAO) 
Next, is my layout entitled Sweet Puppy. My husband surprised me and my son with two (yes - TWO) Golden Retriever puppies just before Christmas this year. They are growing SO fast - and this photo is of the male puppy (Stark - and his sister is Pepper), who is going to be a giant!  I had a lot of fun with this kit - playing with different designs and styles. For this layout, I wanted it to feel very soft and natural, so I started with the beautiful Twiggy paper, and layered that with the peach side of the Nancy's Mushrooms paper on top of the wood-grain Free paper.
I really like the soft, distressed look of paper tearing and love how the torn layers are cradling the fussy-cut picture of the sleeping puppy. For the title, I simply inked the awesome Alphabet Chipboard Stickers with some Distress Ink in Vintage Photo - I chose this colour because it coordinated so well with the wood-grain.
The gorgeous flowers on this layout are Petaloo Darjeeling - Burgundy flowers from the FAO. To finish off the flower cluster, I added in the leaves from the MK and some 'twigs', which are simply pieces of the edging off the burlap (included in the MK).
Finally, I created this double banner using the jute from the MK and the reverse sides of the leftover bits of paper from the torn pages of the layout. I decided to go with different banner shapes to create a more dramatic banner and raise the impact of the layered banner element. On the right side of the banner, you can see another of the gorgeous Petaloo flowers with a leaf and 'twigs'.

~~~~~~~~~~~~~~~
Good Old Boy
(MK, FAO, EAO) 
My final layout with the kit is based on Amy's gorgeous Sketch - be sure to check out the April Sketch Challenge on the ScrapThat! Ning site and play along for a chance to win a wonderful RAK. This layout features the cutest photo of my son and our 18-year old cat Teezer. I am continually amazed by the patience this cat shows for a toddler's over-zealous affection - hence the title Good Old Boy (though I debated using Poor Old Boy given what the poor cat puts up with....). I wanted to go with a rustic/vintage, distressed look for this layout - so I've done a lot of distressing and inking, including sanding the edges of the photo to make it look worn. I did some random punching with two different punches around the edge of the layout and used my fiskars paper tearer to create the wavy-edged green background page.
I did some masking with moulding paste and then spritzed it with Perfect Pearls mist in Heirloom Gold - I also did some inking on the masked area with Distress Ink in Vintage Photo. Not entirely happy with the masking, but it was an experiment. (They can't all turn out perfectly, right?) The layered strips of paper at the bottom of the layout were created with the same punches I used around the outside of the page. I also added in the Prima heart charm string embellishment from the EAO to finish off the layering here. I matted the photo on the burlap from the MK - which I frayed all around the edge to add to the rustic/vintage look of the layout.
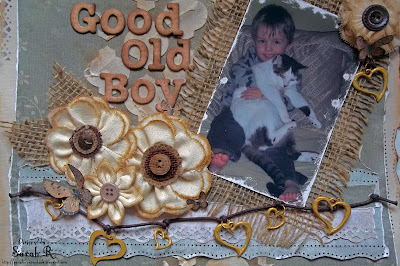
I used the Prima flowers from the FAO, as well as some leftover flowers from the March Kit FAO to create the flower cluster. I cut the burlap leaves with my Tim Holtz Tattered Leaves die and fussy cut some butterflies from the Nancy's Mushroom paper to add to the flowers. I used the Chipboard Alphabet Stickers for the title and inked them with a generous amount of Distress Ink in Vintage Photo.
Finally, I added a small flower cluster with a butterfly and leftover charm to the top right of the photo. This flower originally had a more ornate centre, so I ripped that off and added the brown button so that it coordinated better with the other flowers. I also had to ink the edges of this flower and the smaller flower in the larger cluster (since they were all natural originally). Great detail shot of the photo and sanding here too!
~~~~~~~~~~~~~~~
Well, those are my creations with the ScrapThat! April kit - I actually have LOTS of paper and things leftover, so I'm sure that I'll be able to get at least another layout or two out of the kit and add-ons! 

Thanks so much for stopping by the ScrapThat! blog today.


Tuesday, April 2, 2013

Altered Letter Tutorial by Amarilys

Amarilys here and today I want to share with you how to quickly alter a paper mache or chipboard letter (mine is from Hobby Lobby) to use as decor in your house. I chose the letter A because that's the first letter of my name but you can choose whatever you want and you can even do a whole word. The steps would be the same regardless of what you choose to do. So, let's get started!

Supplies:
  • large letter of your choice
  • ScrapThat! Main Kit
  • Spellbinders Bitty Blossoms die
  • Cuttlebug machine (or any other die cutting machine)
  • Heartfelt Creations (HCPC 3367) Vintage Life Background PreCut Set (or any script background stamp)
  • archival ink in brown
  • Vintage Photo distress ink
  • Martha Stewart Doily Lace Punch
  • brown acrylic paint

Step 1. Trace your letter unto your chosen pattern paper and cut it out. Paint your letter in brown, making sure that the edges are completely covered in paint. Let it dry.


Step 2. Adhere the pattern paper unto the paper mache letter and ink the edges.


Step 3. Randomly stamp the background script stamp on the letter.


Step 4. Punch out a border using a Martha Stewart punch and add to the left side of the letter. Trim the excess.


Step 5. Add a small banner across the letter and spell out whatever you want using the alphas included in the kit.


Step 6. Gather your embellies and hand make a few flowers and leaves using the Bitty Blossom die and papers from the Main Kit.


Step 7. Adhere the embellies to the letter as shown.


Step 8. Finally, add blind pearls around the cluster to finish your letter off.

Here are some close ups of the letter:


I hope that you give this tutorial a try and make an altered letter for your home! This one is now sitting in my scraproom.

Thanks for stopping! I hope that you are inspired to make something with this amazing kit! If you want to see more of my creations, please stop by my blog.

***The April Kit is now available for purchase to non-subscribers in the ScrapThat! Store.

Monday, April 1, 2013

More Winners!

Good afternoon. 
We have lots of winners today at ScrapThat! 

We are so excited to announce that we have surpassed 1,000 likes on Facebook and Kaitlyn has put together this amazing prize package for the person who was number 1,000.


And the winner of this fabulous prize package is:

Valerie Smart

Congratulations, Valerie!! Please email Tracey S. at Tracey@scrapthat.ca.

Next up we have a winner of this Prize package offered by Donna Salazar for our hoppers who commented on the Donna Salazar Blog during the hop:


Random.org has selected a winner:

Rachelle Olaridge

Congratulations, Rachelle! Please send your shipping address to Tracey@scrapthat.ca.

It's been a great day for fans of ScrapThat! 

Be sure to stop by our forum for details about this month's challenges and check out our ScrapThat! Store for details about purchasing kits or becoming a subscriber.

April Blog Hop Winner and LOTW


Thanks to everyone who took part in our blog hop this weekend. There were so many delightful participants and your comments are so appreciated!! Thanks also to Donna Salazar for joining our hop this month. Our DT created such amazing projects with her gorgeous Natural Beauty Collection. 

Blog Hop Winner

The blog hop winner of our Serendipity Main Kit selected by Random.org is:

Sharon Fritchman

Congratulations, Sharon!!

Please contact me at traceysabella@scrapthat.ca to send your shipping information. Thanks!!

Now more exciting news with our LOTW selected by Amarilys:

LOTW Pick 

Leila Cassimira 

"Cardoso"
Congratulations Leila!
Please contact Amarilys for your LOTW badge code.

All winners of our challenges, including Layout of the Week, are eligible to receive 10% off any 2012 Kits-includes Add-ons!

April Blog Hop

Friday, March 29, 2013

April Kit Reveal and Blog Hop !!


Welcome to the ScrapThat! 
April Kit Reveal and Blog Hop!! 

We are so excited to share the details about our newest kit featuring brand new papers
created by Donna Salazar for GCD Studios.

 The Queen of Girlie Grunge herself, Donna Salazar, will also be joining our hop!
When you get to her blog, scroll down and you will see a familiar face - our own fabulously talented DT Leader, Tracey S., is one of 5 artists chosen to be on the 2013 Donna Salazar Guest Design Team! We are so proud of her !!

Should you lose your way, here is the Blog Hop order:

We are so thrilled to welcome the beautiful and creative artist
Lynn Shokoples
as our April Guest Designer!!!


Hi everyone! My name is Lynn Shokoples and I live in Edmonton, Alberta, Canada.  I've also been blessed to join the Bo Bunny and Quick Quotes design teams this year. When I'm not scrapbooking I'm a wife, and a mom to two wonderful young adults, Nicole who's 25 and Ryan who is 20 and my new son-in-law Christopher. I'm so thrilled and honored to be a Guest Designer this month with such a group of talented artists here at ScrapThat. I love to blog and love to meet fellow scrappers, so please feel free to stop by anytime. 

Stop by and visit Lynn's blog at http://scrappyhappymom.blogspot.ca/

Now, without further ado,
 introducing our fabulous April Kit, "Within Nature"

Featuring the GCD/Donna Salazar collection, "Natural Beauty." Opening the box to this kit feels like opening your closet and finding your most favorite, comfortable clothes packed with a little bling! The colors are rich and vintage and range from elegant pale neutrals to muted pinks, to deep denim blues and sages. These are paired with textured blooms from Prima, Petaloo and more!

Take a look:

Main Kit

Embellishment Add-On

Flower Add-On
Paper Add-On

More details on this  Collection can be seen here: ScrapThat! Store 

We are currently accepting new
Kit Club Members.
For more information,
complete the form on the link below:
New Subscriber 

Look at the beautiful sketch Amarilys has created for April:

See details about the challenge here: Sketch Challenges
Be sure to also check out the details of our monthly DT challenge
 hosted in April by Tracey S. here: DT Challenge

Everyone is welcome to participate.
All entries for both challenges are due by April 24th
Something new! All winners of our challenges, including Layout of the Week, will be eligible to receive 10% off any 2012 Kits-includes Add-ons!

Our Blog Hop features 11 fabulous hop sites including our Design Team blogs. 
We have been scrapping away and are so excited to show you our  creations! 

Two Prizes are up for grabs this month.

Donna Salazar will be drawing a winner from hoppers who comment on her blog for this amazing prize package including some of her new products from the Family Jeans collection and one of her brand new stencils.
 Be sure to check out her blog for additional details.

Next up is our SPECTACULAR April Blog Hop Prize
is a ScrapThat!  Main Kit,"Serendipity".
This kit is chock FULL of fabulous scrapbooking products including the amazing Sweet Nothings Collection from Kaiser Craft. With rich warm colors, and rustic embellishments like wooden gates and bronze cord, this kit lends itself beautifully to heritage layouts layouts.  We have included a white pen for you to use when creating a faux stitching effect.
thumbnail_April 2012 Serindipity Kit 021.jpg

To qualify for this month's FABULOUS Prize, 
you must complete the following:

* Visit each blog listed on the hop to see what each designer has created using this month's kit and sketch(comments are very much appreciated).

* Each designer's blog hop post will feature a word to make up a secret sentence,
collect these words along the way.

* You must become a FOLLOWER of each blog along the way 
and LIKE us on our Facebook Page!

* Post the ScrapThat! Blinkie on your blog.

* For your last stop on our Blog Hop return here to the ScrapThat! Chat Blog.
Leave a comment letting us know you have
completed the hop.
(Please do NOT include the secret sentence in your comments.)
*Email the secret sentence to Tracey Sabella:tracey@scrapthat.ca

The Blog Hop ends Sunday, March 31 at Midnight EST


The prize MUST be claimed within 3 days of the forum announcement which will also be made on the ScrapThat! Blog.
~ If left unclaimed a NEW winner will be chosen ~
**Winner will pay actual shipping costs for sending the kit from Canada.**
Shipping costs will be invoiced via PayPal unless you are a kit member,
 then your prize will be shipped with your monthly kit.
Prizes won during the month will be mailed out the first week of the following month.
Due to Customs clearance, International mailings sometimes take 30-75 days to receive.

The first secret word is: 
Spring

Next hop over to our April Guest Designer:

For your final stop, return to the ScrapThat! Blog 
to let us know you have completed the hop.
Remember ~ only send the secret sentence to tracey@scrapthat.ca
Happy Hopping!